
The Sawback trail is a point-to-point hike (or traverse) that connects the communities of Banff and Lake Louise within Banff National Park. Unlike the intense competition for backcountry permits for other areas of the park, this trail is surprisingly low in demand. It is easy to get a true feel for the wilderness of the Canadian Rockies despite not straying too far (technically) from the Trans Canada Highway and all the popular tourist spots.
The typical length of the Sawback trail is 74 km. But with 3 trailheads and 13 campsites interspersed throughout, it’s perfect for a Choose Your Own Adventure. Most itineraries range from 4-6 days. We opted for a longer trip so that we could explore the breathtakingly beautiful Skoki Lakes region.

Highlights
- Wildlife, in particular bears. We saw not one, not two, but FOUR grizzly bears. We also saw a bunny, lots of grouses and heard a pack of wolves howling at the moon one night.
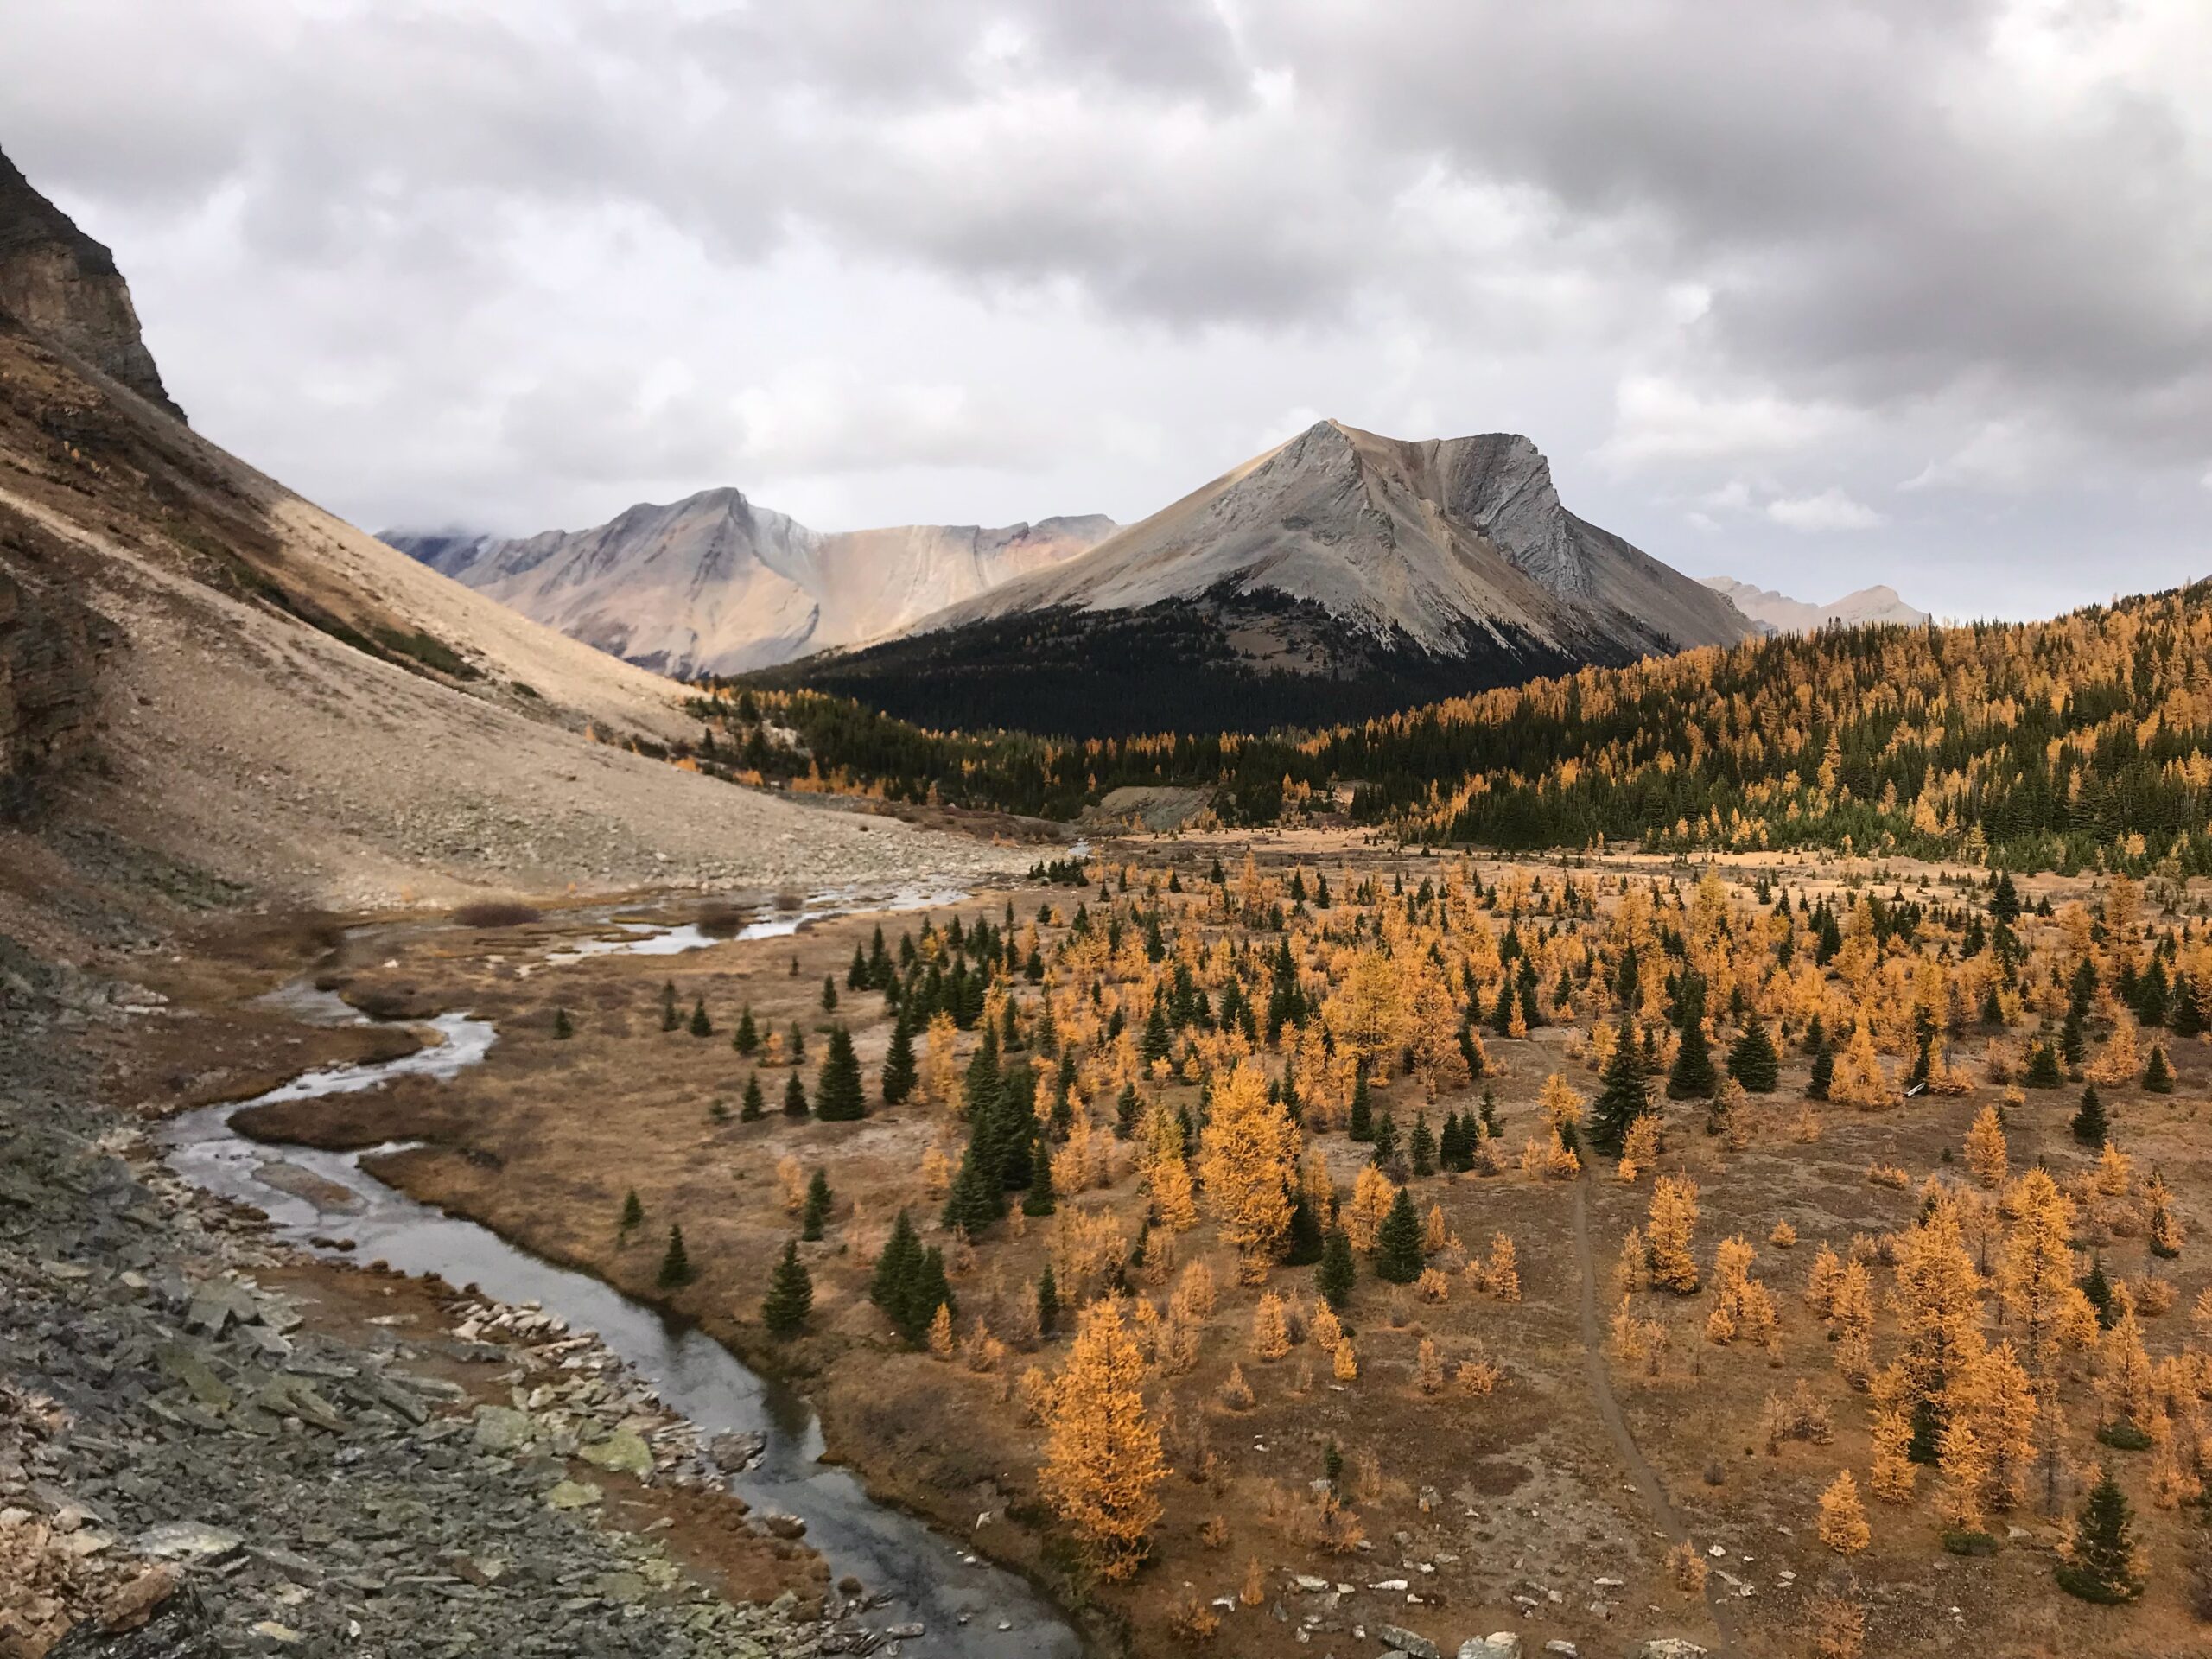
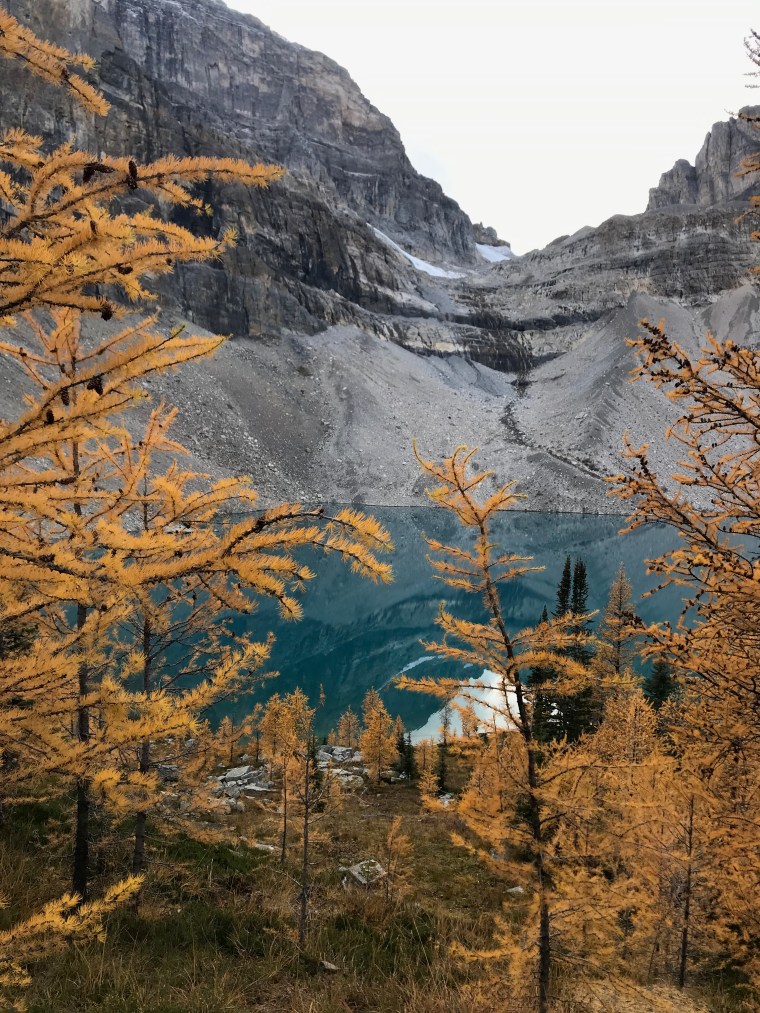
- The golden larches. While a trip during late summer/early fall is a bit tricky in terms of weather, the golden larches really make it worth it.
- The beautiful campsites. The infrastructure along the entire trail was really impressive, from fire pits at camp to trail signage.
- Skoki lakes area. I was so glad that we’d decided to spend some time here, because it was stunning, and the perfect end to the trip.

Lowlights
- The weather. To nobody’s surprise, the weather was quite miserable at times. We got rain, hail, snow and everything in between at various points. Sometimes the only way to not feel cold was to keep hiking or get in our sleeping bags.
- Muddy trails. Mostly a side-effect of the weather, sometimes the trail turned into swamp, which did not help us in our attempts to keep our feet dry.
- Shorter days. Sunset is around 7.30 pm at this time of the year, which was plenty to complete the distance we had planned for each day. But some days, it wasn’t enough to finish up dinner, so we were often rushing straight from dinner to the tent as it became very, very chilly once the sun went away.

What we Packed
I won’t go into the specifics of everything that we carried, but I’ll highlight some items that were relevant for our shoulder season hike – and some that were not.
Backpacking Gear
- A sleep system that would keep you warm! As I mentioned in the lowlights, sometimes the only times I was warm was when I was hiking or when I was in my sleeping bag. I carried a down sleeping bag rated for -9 degrees Celsius, which was handy as it hit sub-zero temperatures some nights. I paired that with a sleeping pad with an R-value of 3.0 (recommended only for summer but I was plenty toasty overall).
- A rain- and storm-proof tent with vestibules for gear storage, as we did have rains and storms and muddy boots and packs.
- An e-reader, which was great because shorter days meant early nights.
- A pair of thick gloves. I had naively only brought my liner gloves, and it soon became apparent that those would not be sufficient. Luckily I figured that out before the hike, so I could pick up a workable pair from a thrift store.
- Bear spray! We thankfully never needed to use it, but man, I sure was glad I had it each time we had a grizzly encounter.
- A pack liner, although some prefer a rain cover for their packs. But mine didn’t come with one, so I fashioned a pack liner using a garbage bag and I kept my sleep system and warm layers inside it.
- My rain jacket, which doubles up as a shell and also as wind protection. It’s packable and light, and I try to never leave home without it.
- Bug spray. This is an item that we did not need and in fact, I left out from my pack at the last moment (after the photo below was taken).
- Various items of sun protection. We did not know this when we packed, but we did not really require any of the sunscreen, sun hat and sunglasses that I carried. If I had to do this all over again, I’d probably still pack it all because I’m an optimist at heart. And also because it’s better to have it and not need it, than need it and not have it. Though I’d probably skip the sun hat.
- A towel. Another object I never ended up needing! I used a plaid shirt as a light layer for warmer days which doubled up as an emergency towel after it got too cold for it. Apart from washing my face (I also had a handkerchief for this), the only time I actually needed a moisture absorber of any kind, was when I got a few drops of water on my sleeping bag.

Meal Planning
On the food front, I did quite a bit of planning. We had to carry food for 6 days, so we wanted to be careful about bringing enough food, even a bit extra, but not an excessive amount that would weigh us down. We planned our own breakfasts, lunches and snacks, but divided up the dinner responsibilities – I prepared 3 dinners whereas Felix made 2.
- Breakfasts: Mostly oatmeal with spice mixes (savoury for me, sweet for Felix) and instant coffee
- Lunches: Bagels with hummus and cheese (vegan for me, dairy for Felix). Felix also brought along pumpernickel and crisp bread with nut butters and a zucchini.
- Dinners: Felix and I split the responsibility, with us cooking 2 and 3 meals respectively. I’ll be writing up my recipes soon, stay tuned to read what I cooked!
- Snacks/Misc: Lots of granola/protein bars, chocolate, mushroom jerky, a nut mix, raisins. We also brought along electrolyte tablets and some other rehydrating drink mixes.
Getting There
The Sawback trail is a through hike. So the natural question is: how do you get from one end to the other?
In our case, we parked our car at Lake Louise and started the hike from Banff.
We were quite fortunate to avail of a series of public transport buses and shuttles to get us from the trailhead at Lake Louise to the trailhead at Banff. This is what we did:

- On the Lake Louise end, the trailhead is the Fish Creek parking lot, which is very close (short walk) to the Lake Louise ski resort.
- A free Parks Canada shuttle, the Park & Ride Connector, goes from the ski resort to the Community of Lake Louise.
- An express public transit Roam bus, the 8X, gets you from the Community of Lake Louise to Banff Transit Hub in under an hour.
- From the transit hub, the free Mt. Norquay shuttle takes you to the Mt. Norquay ski resort, which is where the Cascade Amphitheater trailhead is.
All of this took the better part of the first morning. But I’m grateful that due to public transport, we could make this trip happen without needing a second car or a very expensive cab ride.
In the next parts, I’ll go into a day by day breakdown of our trip!
Pingback: Backpacking the Sawback Trail Part 2 - Beyond Trail Mix
Pingback: Backpacking the Sawback Trail Part 3 - Beyond Trail Mix
I love how easy it was to read the blog. It was like talking to a friend and it was very comprehensive. My favorite part was ofc the photos. I can’t believe they are real!